Activity 44: Documentation of Python Flask Encryption and Decryption
Python Flask Encryption and Decryption using Fernet (with cryptography library)
Encryption and decryption are crucial concepts in cryptography. In Flask applications, they are often used to protect sensitive data such as user passwords, API keys, and personal information.
Encryption refers to converting readable data (plaintext) into an unreadable format (ciphertext), which can only be reverted back to the original format with the correct key (decryption). Decryption is the process of converting encrypted data back into its original readable format using the correct key.
Importance of Encryption and Decryption in Flask Applications:
Data Privacy: Encryption ensures that sensitive data such as user information, passwords, and messages are securely stored and transmitted.
Data Integrity: It ensures that data is not tampered with during transmission by detecting unauthorized alterations.
Compliance: Many industries (e.g., healthcare, finance) require encryption to comply with legal data protection regulations.
Security: Prevents unauthorized access, even if an attacker gains access to your database or communication channels.
In Python Flask, we can implement encryption and decryption easily using libraries like cryptography, which provides symmetric encryption (e.g., using Fernet).
Let's step through an example of how to implement encryption and decryption using Flask with the Fernet symmetric encryption algorithm.
Step-by-Step Implementation
Install the Necessary Libraries
You need to install
Flaskfor the web framework andcryptographyfor encryption and decryption:pip install Flask cryptographySet up Flask Application
Create a new folder for the project and name it
surname_python_flask_encryption_and_decryption. Inside that folder, create a Python fileapp.py.Import Required Libraries in
app.pyWe will import
Flaskto create the application,Fernetfor encryption/decryption, andjsonifyfor sending responses.from flask import Flask, request, jsonify from cryptography.fernet import FernetGenerate a Fernet Key
Fernet encryption requires a key to encrypt and decrypt data. You can generate a key once and save it to use later.
 # Generate a key
 key = Fernet.generate_key()

 # Save the key to a file (or store it securely)
 fernet = Fernet(key)
Create the Flask App and Define Routes
We will create two POST routes:
/encryptfor encrypting data and/decryptfor decrypting data.app = Flask(__name__) # POST /encrypt route for encrypting data @app.route('/encrypt', methods=['POST']) def encrypt(): data = request.json.get('data') # Get the data from the request body if not data: return jsonify({'error': 'No data provided'}), 400 # Encrypt the data encrypted_data = fernet.encrypt(data.encode()) return jsonify({'encrypted_data': encrypted_data.decode()}), 200 # POST /decrypt route for decrypting data @app.route('/decrypt', methods=['POST']) def decrypt(): encrypted_data = request.json.get('encrypted_data') # Get the encrypted data if not encrypted_data: return jsonify({'error': 'No encrypted data provided'}), 400 try: # Decrypt the data decrypted_data = fernet.decrypt(encrypted_data.encode()).decode() except Exception as e: return jsonify({'error': str(e)}), 400 return jsonify({'decrypted_data': decrypted_data}), 200 if __name__ == '__main__': app.run(debug=True)
Code Explanation:
Flask App Setup: We initialize the Flask app and define two routes for encryption and decryption. The
encryptfunction takes data, encrypts it with the Fernet key, and sends the encrypted data as a response. Thedecryptfunction takes encrypted data, decrypts it using the same Fernet key, and sends the decrypted result back.Encrypting Data:
The
encryptfunction gets the plaintext data from the JSON body of the POST request, encodes it, and then usesfernet.encrypt()to convert it into ciphertext.The result is sent as a JSON response.
Decrypting Data:
The
decryptfunction retrieves the encrypted data from the request, decodes it, and usesfernet.decrypt()to get back the original plaintext.The decrypted data is sent as a JSON response.
Running the Application:
Start the Flask Server: Run the Flask app using the command:
python app.pyThis will start the Flask server on
http://127.0.0.1:5000.Test the Endpoints using
curlor Postman:Encrypt Data:
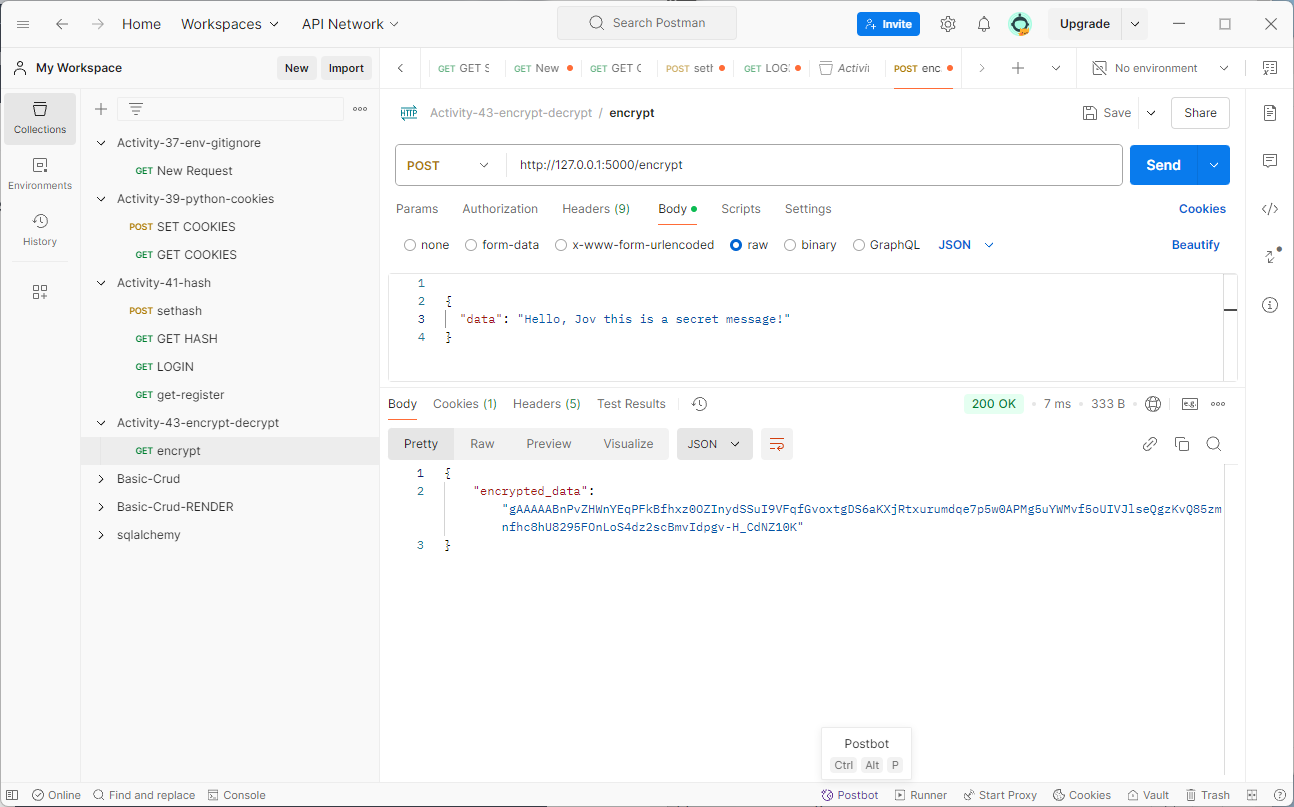
To encrypt some data, use the
/encryptPOST method with a JSON body:POST http://127.0.0.1:5000/encrypt{ "data": "Hello, this is a secret message!" }Example response:
  {
      "encrypted_data": "gAAAAABnPvZHWnYEqPFkBfhxz0OZInydSSuI9VFqfGvoxtgDS6aKXjRtxurumdqe7p5w0APMg5uYWMvf5oUIVJlseQgzKvQ85zmnfhc8hU8295FOnLoS4dz2scBmvIdpgv-H_CdNZ10K"
  }
Decrypt Data:
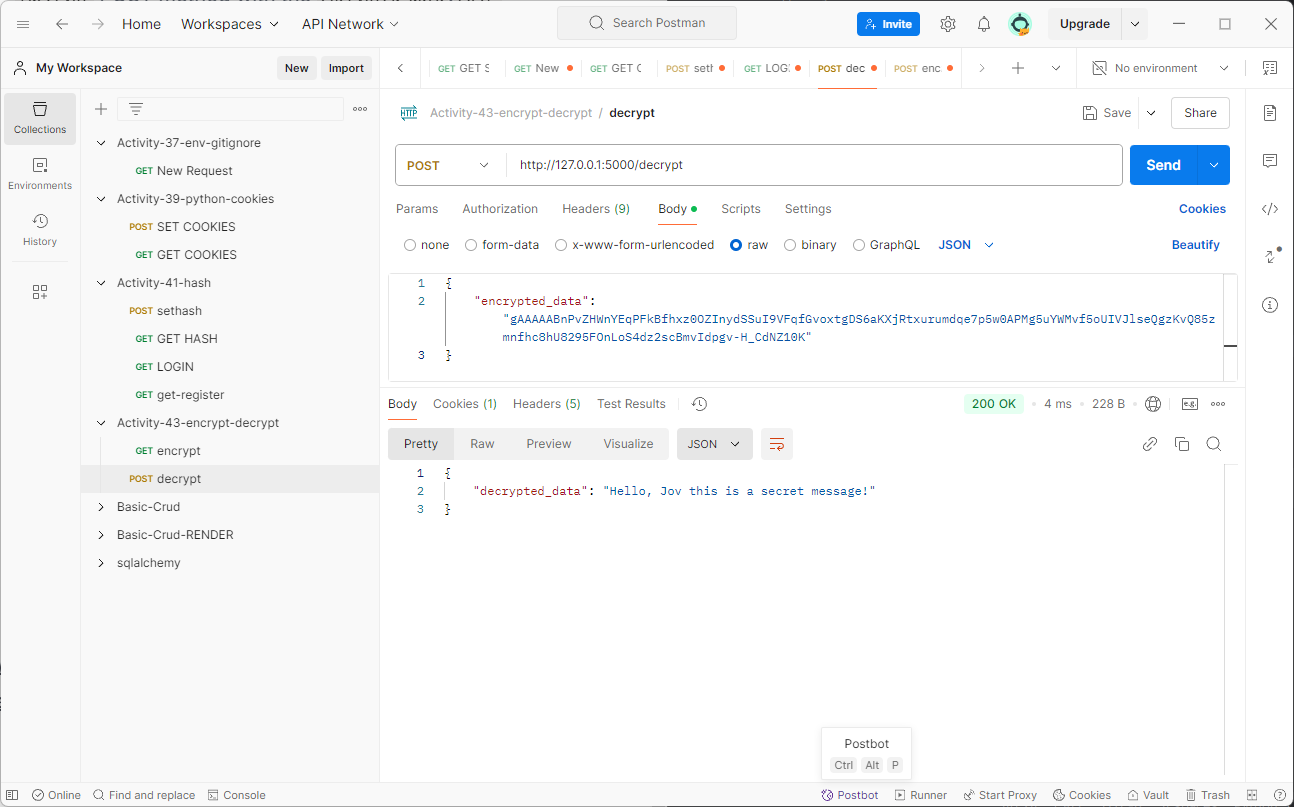
To decrypt the previously encrypted data, use the
/decryptPOST method with theencrypted_data:POST http://127.0.0.1:5000/decrypt{ "encrypted_data": "gAAAAABnPvZHWnYEqPFkBfhxz0OZInydSSuI9VFqfGvoxtgDS6aKXjRtxurumdqe7p5w0APMg5uYWMvf5oUIVJlseQgzKvQ85zmnfhc8hU8295FOnLoS4dz2scBmvIdpgv-H_CdNZ10K" }Example response:
  {
      "decrypted_data": "Hello, Jov this is a secret message!"
  }
https://github.com/JovRoncal/roncal_python_flask_encryption_and_decryption